
How to Clean Car Engine Bay: Steps, Tips, and Common Mistakes
Cleaning your car’s engine bay can seem like a big task, but it’s a straightforward process that offers many benefits. A clean engine bay helps your car run cooler, makes it easier to spot leaks or issues, and improves its overall appearance. You can achieve a spotless engine bay at home with the right tools and a careful approach. This guide will walk you through everything you need to know to clean your car engine bay safely and effectively, from gathering supplies to avoiding common pitfalls.
Why Cleaning Your Engine Bay Matters
Keeping your engine bay clean is more than just about looks. It plays a role in your vehicle’s health and performance. Over time, dirt, dust, oil, and road grime build up, which can cause several problems.
Benefits of a Clean Engine Bay
A clean engine bay offers practical advantages for any car owner. These benefits contribute to both the longevity and value of your vehicle.
- Easier Maintenance: A clean engine makes it simpler to spot fluid leaks, cracked hoses, or loose wires. This allows you to address small problems before they become major repairs.
- Improved Heat Dissipation: Dirt and grime can act as an insulating layer, trapping heat around engine components. Removing this buildup helps the engine cool more efficiently, which can extend the life of various parts.
- Enhanced Resale Value: When selling your car, a clean engine bay shows potential buyers that you’ve taken good care of the vehicle. It suggests a well-maintained car, increasing its appeal and value.
- Pest Prevention: A dirty engine bay can attract rodents looking for a warm, sheltered place to nest. Cleaning it regularly helps deter these unwanted visitors who can chew through wires.
- Better Performance: While not a direct performance boost, a clean engine bay ensures sensors and electrical connections are free from interference, helping the engine run as intended.
Essential Tools and Materials for Engine Bay Cleaning
Before you start, gather all the necessary items. Having everything ready will make the cleaning process smoother and safer.
What You’ll Need
Most of these items are readily available at auto parts stores or even around your home. Choose products specifically designed for automotive use when possible.
- Engine Degreaser: Look for an automotive-specific degreaser. Biodegradable options are often preferred.
- All-Purpose Cleaner (APC): A diluted APC can be used for lighter dirt and general cleaning.
- Detailing Brushes: Various sizes of brushes (soft, medium, stiff bristles) are helpful for reaching tight spots and scrubbing grime.
- Microfiber Towels: Several clean microfiber towels for wiping and drying.
- Plastic Bags and Tape: To cover sensitive electrical components.
- Protective Gear: Safety glasses, gloves, and a mask are important for your protection.
- Garden Hose with Spray Nozzle: For rinsing, ensure it has a gentle spray setting.
- Air Compressor or Leaf Blower: For drying (optional, but highly recommended).
- Engine Dressing/Protectant: To protect and shine plastic and rubber components after cleaning.
- Bucket of Water: For rinsing brushes and diluting cleaners.
Safety First: Important Precautions
Cleaning an engine bay involves working with water, chemicals, and electrical components. Taking proper safety steps is crucial to prevent injury and damage to your vehicle.
Key Safety Measures
Always prioritize safety. These precautions will help you avoid common hazards during the cleaning process.
- Ensure the Engine is Cool: Never clean a hot engine. Let your car sit for at least an hour, or until the engine is cool to the touch. Hot surfaces can cause cleaners to evaporate too quickly, leaving stains, and can also be a burn hazard.
- Disconnect the Battery: This is a critical step to prevent electrical shorts. Disconnect the negative terminal first, then the positive. Secure the cables away from the battery terminals.
- Wear Protective Gear: Always wear safety glasses to protect your eyes from splashes. Chemical-resistant gloves will protect your hands from degreasers and cleaners. A mask can prevent you from inhaling fumes.
- Cover Sensitive Components: Use plastic bags and tape to cover the alternator, battery terminals (if not disconnected), fuse box, air intake, and any exposed electrical connectors. Ensure these covers are secure.
- Avoid High-Pressure Water: A garden hose with a gentle spray is sufficient. High-pressure washers can force water into electrical connections, causing damage.
- Work in a Well-Ventilated Area: Engine degreasers can produce strong fumes. Work outdoors or in a garage with the door open to ensure good airflow.
- Protect Your Driveway: Place cardboard or old newspapers under the engine bay to catch drips of degreaser and dirty water, protecting your driveway from stains.
Step-by-Step Guide to Cleaning Your Car Engine Bay
Follow these steps carefully to achieve a clean and protected engine bay. Take your time with each stage for the best results.
Step 1: Prepare the Engine Bay
Proper preparation is key to a safe and effective cleaning. This involves cooling the engine and protecting sensitive parts.
- Cool Down: Make sure the engine is completely cool. This prevents cleaners from drying too fast and reduces burn risks.
- Disconnect Battery: Remove the negative terminal first, then the positive. Tuck the cables away safely.
- Cover Electronics: Use plastic bags and tape to cover the alternator, fuse box, battery (if not removed), and any exposed electrical connections. Ensure the air intake is also covered.
- Remove Debris: Use an air compressor or a soft brush to remove loose leaves, dirt, and other debris from the engine bay.
Step 2: Apply Degreaser
Degreaser helps break down oil and grease buildup. Apply it evenly but avoid oversaturating.
- Spray Degreaser: Apply an automotive-specific engine degreaser to greasy areas. Follow the product instructions for application.
- Let it Dwell: Allow the degreaser to sit for the recommended time, usually 5-10 minutes. Do not let it dry on the surface.
- Agitate Stubborn Spots: Use detailing brushes to gently scrub heavily soiled areas. This helps the degreaser work more effectively.
Step 3: Gentle Rinse
Rinsing removes the degreaser and loosened grime. Use a gentle water flow to prevent damage.
- Low-Pressure Rinse: Use a garden hose with a gentle spray nozzle. Start from the top of the engine bay and work your way down.
- Avoid Direct Spray on Covered Parts: Be careful not to spray directly into the covered electrical components. A light mist is usually enough to rinse these areas.
- Thorough Rinse: Ensure all degreaser residue is rinsed away. Leftover degreaser can leave streaks or attract new dirt quickly.
Step 4: Clean Other Surfaces
After rinsing the main engine components, address other areas like the underside of the hood and fender wells.
- Underside of Hood: Spray an all-purpose cleaner or diluted degreaser on the underside of the hood. Wipe clean with a microfiber towel.
- Fender Wells: If accessible, clean the inner fender wells with your degreaser or APC and a brush. Rinse thoroughly.
Step 5: Dry the Engine Bay
Thorough drying is essential to prevent water spots and potential electrical issues. This step is often overlooked but very important.
- Air Dry: Use an air compressor, leaf blower (on a low setting), or even a shop vacuum on reverse to blow water out of crevices and off surfaces.
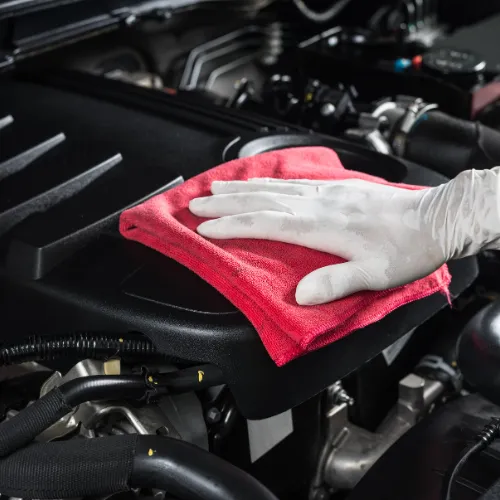
- Wipe Down: Use clean, dry microfiber towels to wipe down all accessible surfaces.
- Remove Covers: Once the engine bay is mostly dry, carefully remove the plastic bags and tape from electrical components. Wipe these areas dry as well.
- Reconnect Battery: Reconnect the positive terminal first, then the negative.
Step 6: Apply Engine Dressing and Protectant
This final step protects plastic and rubber components, giving your engine bay a fresh, finished look.
Common Mistakes to Avoid When Cleaning Your Engine Bay
Knowing what not to do is just as important as knowing what to do. Avoiding these common errors will help protect your vehicle.
- Cleaning a Hot Engine: As mentioned, this can cause cleaners to dry too quickly and pose a burn risk. Always wait for the engine to cool down completely.
- Using High-Pressure Water: Pressure washers can force water into sensitive electrical connections, leading to costly damage. Stick to a gentle stream from a garden hose.
- Not Covering Electrical Components: Failing to protect the alternator, fuse box, and other electronics can result in short circuits or corrosion.
- Letting Degreaser Dry: If degreaser dries on surfaces, it can leave stubborn stains or a white residue that is difficult to remove.
- Using Harsh Household Cleaners: Products not designed for automotive use can be too aggressive and damage plastic, rubber, or painted surfaces in the engine bay.
- Ignoring Drying: Leaving water in the engine bay can lead to corrosion, water spots, or electrical problems. Thorough drying is crucial.
- Forgetting to Disconnect the Battery: This is a major safety oversight that can lead to electrical shorts or even serious injury.
How Often Should You Clean Your Engine Bay?
The frequency of cleaning depends on several factors, including your driving conditions and climate. Regular cleaning prevents heavy buildup.
Recommended Cleaning Schedule
Most vehicles benefit from a thorough engine bay cleaning once or twice a year. However, some situations might require more frequent attention.
| Driving Conditions | Recommended Frequency | Notes |
|---|---|---|
| Daily Commuting (Paved Roads) | Every 6-12 months | General dust and light grime buildup. |
| Off-Roading / Rural Driving | Every 3-6 months | More exposure to mud, dirt, and debris. |
| Salty Roads (Winter) | Every 3-6 months | Salt can accelerate corrosion; rinse frequently. |
| Heavy Oil Leaks / Repairs | As needed | Clean up spills immediately to prevent damage. |
| Show Car / Enthusiast | Monthly or as desired | For maintaining a pristine appearance. |
Even if you don’t do a full deep clean, a quick wipe-down of accessible surfaces every few months can help keep things tidy. This also makes the deeper cleaning process easier when it’s time.
Professional Engine Bay Cleaning vs. DIY
You might wonder if it’s better to clean your engine bay yourself or have a professional do it. Both options have their pros and cons.
Making the Right Choice
Your decision often comes down to your comfort level, available time, and budget. DIY cleaning is very achievable for most car owners.
- DIY Cleaning:
- Pros: Cost-effective, you control the products used, satisfying to do yourself.
- Cons: Requires time and effort, potential for mistakes if not careful, may not achieve professional-level results on heavily soiled engines.
- Professional Cleaning:
- Pros: Expert knowledge and specialized tools, often includes steam cleaning or dry ice blasting for deep grime, ensures safety and proper protection.
- Cons: More expensive, you might not know what chemicals are being used, less personal control over the process.
For most people, a DIY approach is perfectly adequate for regular maintenance. If your engine bay is extremely dirty, has significant oil leaks, or you’re unsure about the process, a professional detailer might be a good investment.
FAQs
Is it safe to spray water directly on a car engine?
Yes, it is generally safe to spray water on a car engine, but with important precautions. Always use a low-pressure stream from a garden hose, not a high-pressure washer. Ensure the engine is cool and that sensitive electrical components like the alternator, fuse box, and air intake are covered with plastic bags and tape before rinsing.
What is the best product to clean a car engine bay?
The best product is an automotive-specific engine degreaser. Brands like Chemical Guys, Meguiar’s, or Simple Green (automotive formula) offer effective and safe options. Look for biodegradable formulas if possible. An all-purpose cleaner (APC) diluted according to instructions can also be used for lighter dirt.
Do I need to disconnect the battery before cleaning the engine?
Yes, it is highly recommended to disconnect the battery before cleaning your engine bay. This crucial safety step prevents electrical shorts and potential damage to your car’s electrical system. Disconnect the negative terminal first, then the positive, and secure the cables away from the battery.
How do I dry my engine bay after cleaning?
Thorough drying is essential. You can use an air compressor or a leaf blower (on a low setting) to blow water out of crevices and off surfaces. Follow up by wiping down all accessible areas with clean, dry microfiber towels. Allow the engine bay to air dry completely for at least an hour, or even longer, before starting the car.
Can I use a pressure washer on my engine?
It is generally not recommended to use a high-pressure washer on your engine. The strong stream can force water into electrical connections, sensors, and other sensitive components, leading to damage or malfunctions. A garden hose with a gentle spray nozzle is sufficient and much safer for rinsing.
How often should I clean my car’s engine bay?
For most daily drivers, cleaning the engine bay once or twice a year is sufficient. If you drive in dusty, muddy, or salty conditions (like during winter), you might want to clean it more frequently, perhaps every 3-6 months, to prevent heavy buildup and corrosion.
Conclusion
Cleaning your car engine bay is a rewarding task that contributes to your vehicle’s longevity, performance, and appearance. By following the right steps, using appropriate tools, and prioritizing safety, you can achieve a professional-looking result at home. Remember to cool the engine, protect electrical components, use gentle water pressure, and dry thoroughly. Regular cleaning not only keeps your engine looking great but also helps you spot potential issues early. Take the time to give your engine bay the care it deserves, and your car will thank you for it.
Related posts
 Best Way to Clean and Maintain Your Car’s Paint Finish Safely
Keeping your car’s paint finish looking fresh is more than just about looks. A well-maintained paint job protects your car from rust, UV damage, and can…
 How to Remove Brake Dust from Car Wheels Quickly and Safely
If you own a car, you know how quickly the wheels can get dirty. One of the most stubborn types of dirt is brake dust. Even…
 How to Remove Bug Splatter from Your Car Paint: Expert Tips
Bug splatter on your car paint is more than just an annoying sight—it can actually harm your vehicle’s surface. Insects hit your car at high speeds,…