
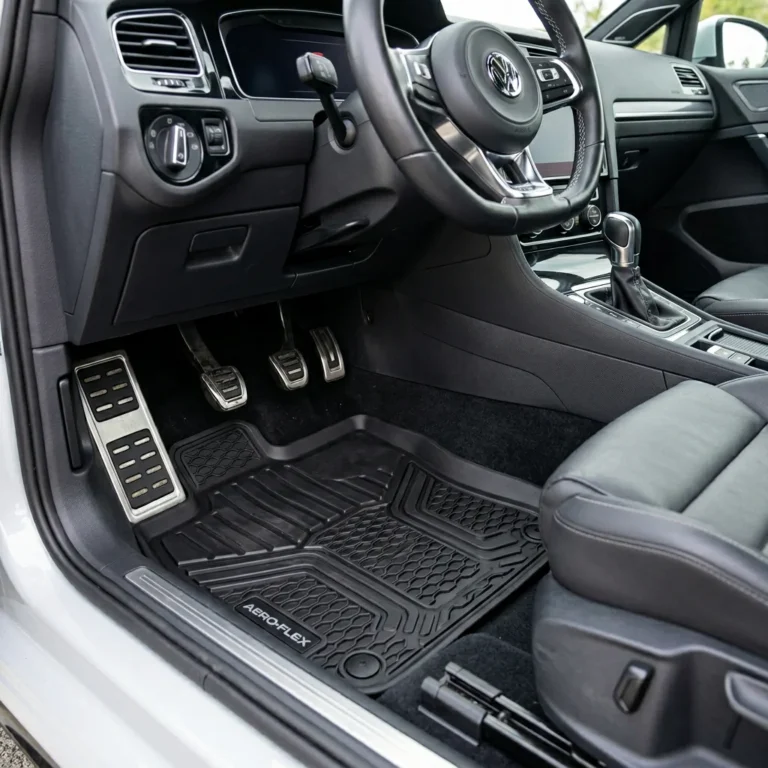
How to Deep Clean Your Car’s Deep Dish Floor Mats
Deep dish floor mats are designed to catch and contain spills, mud, and debris, which is great for protecting your car’s carpet. However, this design also means they can trap a lot of dirt, making them challenging to clean.
To get your deep dish floor mats looking like new, you’ll need to remove them from your vehicle, give them a good scrub, rinse them thoroughly, and ensure they dry completely. This guide will walk you through each step, offering practical advice for tackling even the toughest grime.
Safety checks
- Remove mats from the car for best results.
- A good scrub brush is essential for deep dish mats.
- Thorough rinsing is key to removing all cleaning agents.
- Ensure mats are completely dry before reinstallation.
| Topic | When it helps | What to keep in mind |
|---|---|---|
| Step 1 | All deep dish floor mats. | Don’t skip this step; cleaning in the car is less effective and can make a mess. |
| Step 2 | Mats with significant loose dirt or mud. | Ensure your hose has enough pressure to dislodge dirt but not so much that it damages older mats. |
| Step 3 | Removing embedded dirt and grime from the mat’s surface. | Avoid abrasive cleaners or steel wool, which can scratch or damage the mat material. |
| Step 4 | Preventing residue that can attract more dirt or cause odors. | Incomplete rinsing can leave a sticky film that attracts dust. |
| Step 5 | Preventing odors and damage to the car’s interior. | Never reinstall damp mats, as this can lead to mold, mildew, and unpleasant smells in your car. |
This article will focus exclusively
Step 1. Remove and Prepare the Mats
Take the floor mats out of your vehicle. This allows you to clean them more thoroughly and prevents dirt from being pushed further into your car’s carpet.
- All deep dish floor mats.
- Don’t skip this step; cleaning in the car is less effective and can make a mess.
- Inspect the mats for any large debris that can be picked off by hand before washing.
Step 2. Pre-rinse and Initial Vacuum
Use a hose to rinse the mats, aiming to wash away as much loose dirt as possible. For stubborn dirt, a quick pass with a shop vacuum can help lift embedded particles before you apply any cleaning solutions.
- Mats with significant loose dirt or mud.
- Ensure your hose has enough pressure to dislodge dirt but not so much that it damages older mats.
- If you don’t have a hose, a strong spray bottle with water can work for a preliminary rinse.

Step 3. Scrubbing the Deep Channels
Apply a suitable cleaner (like a mild soap solution or specialized mat cleaner) to the mats. Use a stiff-bristled brush to scrub the entire surface, paying close attention to the deep channels and edges where dirt accumulates.
- Removing embedded dirt and grime from the mat’s surface.
- Avoid abrasive cleaners or steel wool, which can scratch or damage the mat material.
- For rubber or plastic mats, a mixture of dish soap and water is often effective.
Step 4. Thorough Rinsing
Rinse the mats completely with clean water. Ensure all soap residue and loosened dirt are washed away.
- Preventing residue that can attract more dirt or cause odors.
- Incomplete rinsing can leave a sticky film that attracts dust.
- Tilt the mats to allow water to flow out of the channels, ensuring a complete rinse.
Step 5. Drying the Mats
Allow the mats to air dry completely, preferably in the sun or a well-ventilated area. You can hang them over a railing or lay them flat.
- Preventing odors and damage to the car’s interior.
- Never reinstall damp mats, as this can lead to mold, mildew, and unpleasant smells in your car.
- If time is short, you can use a leaf blower or a powerful fan to speed up the drying process.
Gather Your Cleaning Supplies
Before you begin tackling the grime on your deep dish floor mats, gather the right tools. Having everything on hand will make the cleaning process much smoother and more effective.
Essential items include a stiff-bristled brush (a scrub brush or even an old toothbrush for tight spots works well), a bucket, a mild cleaning solution like dish soap or a dedicated car mat cleaner, and access to water, preferably from a hose. A shop vacuum can also be very helpful for initial debris removal.

Having a stiff-bristled brush, a bucket, mild soap, and a hose ready before starting makes the entire process more efficient.Starting the cleaning process without all necessary supplies, leading to delays or incomplete cleaning.Stiff-bristled scrub brush.Bucket.Mild soap (dish soap or car mat cleaner).Water source (hose recommended).Shop vacuum (optional but helpful).
The Deep Cleaning Process: Step-by-Step
Cleaning deep dish floor mats requires a bit more attention to detail than standard mats. The raised edges are designed to trap messes, so you need to actively work to get them clean.
Once the mats are removed and pre-rinsed, apply your chosen cleaner. For rubber or plastic mats, a solution of warm water and a few drops of dish soap is often sufficient.
After scrubbing, rinse the mats thoroughly. Use a hose to spray down the entire mat, ensuring all soap and loosened dirt are washed away.
Focusing the brush on the raised edges and deep channels ensures that trapped mud and grit are loosened and removed, which is crucial for deep dish mats.
Not scrubbing the deep channels thoroughly, leaving dirt hidden in the grooves.
Dealing with Stubborn Stains and Caked-On Mud
For particularly tough spots, like caked-on mud or dried-on spills, you might need a bit more elbow grease. Let the cleaner sit on the stain for a few minutes before scrubbing again.
- Apply cleaner and let it dwell.
- Use a plastic scraper for thick mud.
- Baking soda paste for tough stains.
Drying and Reinstallation
Once your deep dish floor mats are clean, the drying process is just as important as the cleaning itself. Reinstalling damp mats can lead to mold, mildew, and a persistent musty odor in your vehicle, which can be difficult to get rid of.
The best way to dry them is to let them air dry completely. Find a sunny spot or a well-ventilated area.
If you’re in a hurry, you can use a leaf blower or a powerful fan to speed up the drying process. Once the mats are completely dry to the touch, both on top and underneath, they are ready to be placed back into your car.
Hanging the mats over a fence or car wash bay rack allows air to circulate around them, speeding up drying and ensuring the undersides dry too.
Reinstalling damp mats, which can lead to mold, mildew, and unpleasant smells in the car’s interior.
- Air dry in a sunny or well-ventilated area.
- Hang mats to allow circulation on all sides.
- Ensure the underside is completely dry.
- Use a fan or leaf blower to speed up drying if needed.
- Check for complete dryness before reinstallation.
FAQs
Can I use Dawn dish soap on my deep dish floor mats?
Yes, Dawn dish soap is generally safe and effective for cleaning most rubber and plastic deep dish floor mats. It’s a good degreaser and helps lift dirt and grime without being too harsh.
How do I clean really dirty or muddy deep dish floor mats?
For heavily soiled mats, start by removing as much loose mud as possible. Then, use a stiff brush and a strong cleaner, letting it sit for a few minutes before scrubbing vigorously.
Is there a special cleaner for WeatherTech or similar deep dish mats?
Many brands, like WeatherTech, offer their own specialized cleaners designed for their mats. These are often formulated to be safe for the specific materials used.
How often should I clean my deep dish floor mats?
It’s best to give them a quick shake-out and rinse every few weeks. A deep clean is recommended every 2-3 months, or more often if they get particularly dirty from weather or spills.
Can I put my deep dish floor mats in a pressure washer?
While some heavy-duty rubber mats might withstand a low-pressure wash, it’s generally not recommended. High pressure can damage the material, especially if it’s older or has any cracks.
Conclusion
Keeping your deep dish floor mats clean is essential for maintaining your car’s interior and protecting its original carpet. By following these steps, you can effectively remove dirt, mud, and spills, ensuring your mats look their best and continue to serve their protective purpose.
Remember to always remove the mats for cleaning, use a stiff brush to get into those deep channels, rinse thoroughly, and ensure they are completely dry before putting them back. A little effort now can save your car’s interior from long-term damage and keep your vehicle looking sharp.
Related posts
 Why Choose Rubber Mats for Off-Road Vehicles: Durability & Protection
Discover why rubber mats are the top choice for off-road vehicles. Learn about their durability, protection against elements, and ease of cleaning. When you’re heading off…
 Benefits of Heavy-Duty Floor Mats for Trucks
Discover the key benefits of heavy-duty floor mats for trucks, including superior protection, easier cleaning, and enhanced resale value. Learn why they're a smart investment. Heavy-duty…
 How to Organize Your Car’s Floor Mats for a Tidy Interior
Learn practical ways to organize your car's floor mats, from securing them in place to smart storage solutions for spare sets, keeping your interior clean. Organizing…