If you own a Jeep Wrangler, you know the thrill of off-road adventures and open-air drives. But you may have also noticed a common problem: the stock hood catches can be weak, especially after years of use or when you add bigger tires and travel over rough terrain. This can lead to hood flutter, where the hood shakes or lifts at high speeds—a distracting and sometimes worrying issue. Installing upgraded hood catches is a practical, satisfying project that can make your Jeep look tougher and give you peace of mind on the road or trail.
Changing out your hood catches isn’t just about looks—it’s about safety and stability. Whether you’re a beginner with basic tools or a more experienced DIYer, this guide will walk you through each step, from choosing the right catches to finishing touches.
You’ll learn what tools to use, how to avoid common mistakes, and get tips only seasoned Jeepers know. Let’s make your Wrangler ready for anything.
Why Upgrade Your Jeep Wrangler Hood Catch?
The factory hood latches on many Jeep Wranglers, especially models from 2007 onward, are known to stretch and wear out. This is because they’re often made from soft rubber that degrades in sunlight and extreme temperatures. When this happens, the hood can move up and down, causing that unsettling flutter at highway speeds.
Upgraded hood catches are usually made from aluminum, steel, or heavy-duty plastics. They provide:
- Improved hood stability at all speeds
- Longer lifespan compared to stock rubber latches
- Better aesthetics, with options for custom finishes
- Extra security against accidental hood opening
Many Jeep owners also report that aftermarket hood catches are easier to adjust and give a firmer hold, even after thousands of miles.
Tools And Materials You’ll Need
Before starting, it’s essential to have all the right tools and materials ready. This will make the installation smoother and help you avoid frustration.
- New hood catches (make sure they fit your specific year/model)
- Socket wrench set (usually 10mm, 13mm, or 15mm sockets)
- Ratchet and extensions
- Screwdriver (Phillips and flathead)
- Pliers (needle nose can be useful)
- Allen keys (for some aftermarket catches)
- Torque wrench (recommended for precise tightening)
- Threadlocker (optional but helps prevent bolts from loosening)
- Gloves and safety glasses
Some kits include all necessary hardware. Double-check before you begin so you don’t stop mid-project to buy missing pieces.
Comparing Popular Hood Catch Types
Choosing the right hood catch is an important step. Here’s a quick comparison of common types:
| Type | Material | Pros | Cons |
|---|---|---|---|
| Rubber (OEM) | Rubber/Plastic | Inexpensive, easy to replace | Prone to wear, less stable |
| Aluminum | Aluminum Alloy | Strong, rust-resistant, stylish | May cost more, can scratch paint if not installed carefully |
| Steel | Stainless Steel | Very strong, secure | Heavier, can rust if coating is damaged |
| Locking | Metal/Composite | Added security, theft deterrent | Keys can be lost, more parts to maintain |
Tip: Many Jeep owners prefer aluminum for its balance of strength and weight, but locking options are popular in urban areas.
Preparing Your Jeep Wrangler
Preparation is key to a smooth installation. Park your Jeep on a flat surface and let the engine cool. Open the hood fully and secure it with the prop rod.
- Remove any covers or accessories around the hood latch area.
- Clean the mounting surfaces with a mild cleaner. Dirt and debris can cause scratches or make bolts hard to remove.
- Lay out all your tools and new hardware within easy reach.
It’s smart to take a few photos of the original hood catches before removal. This gives you a visual reference if you need to check alignment later.
Credit: partiesinthepark.com
Removing The Old Hood Catches
This part is straightforward but requires patience. Most Jeep Wranglers have two hood catches—one on each side. Work on one side at a time.
- Locate the upper and lower hood catch brackets. The upper attaches to the hood; the lower attaches to the fender.
- Support the hood. Even with the prop rod, be gentle so the hood doesn’t shift.
- Remove the bolts or nuts holding the upper catch using your socket wrench.
- Carefully pull off the upper bracket. Set aside bolts if you plan to reuse them.
- Remove the lower catch bracket in the same way.
- Inspect the area for rust or damage. Clean as needed.
Non-obvious insight: If bolts are stuck, spray with penetrating oil and wait a few minutes. For older Jeeps, rust can make removal tricky.
Installing The New Hood Catches
Now comes the rewarding part—putting on the new hardware.
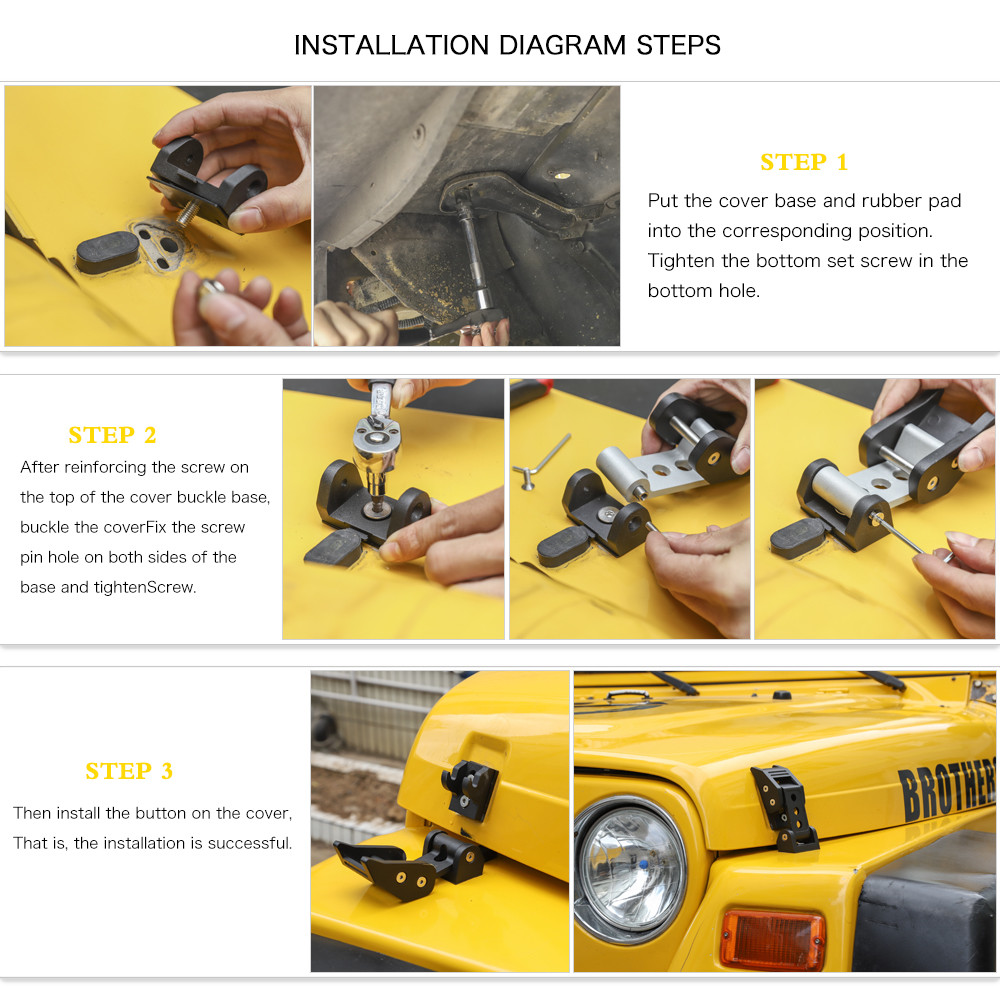
- Position the new lower bracket where the old one was removed. Some kits include gaskets or spacers; make sure to use them as directed.
- Hand-tighten the bolts first to ensure proper alignment.
- Attach the upper hood catch to the hood. Again, hand-tighten before fully securing.
- Check alignment. Close the hood gently to see if the catches line up. Adjust as needed.
- Tighten all bolts to the manufacturer’s recommended torque. Over-tightening can damage paint or strip threads.
- Apply threadlocker to bolts if recommended. This prevents them from vibrating loose over time.
Practical tip: Some aftermarket catches are adjustable. You can fine-tune the tension to get a perfect fit—just enough to hold the hood firmly but not so tight it’s hard to open.
Credit: www.youtube.com
Fine-tuning And Testing
Don’t rush through this part. A well-adjusted hood catch means no flutter and a smooth opening experience.
- Close the hood slowly. Make sure the new catches engage fully without excessive force.
- Open and close the hood several times. Listen for rubbing, clicking, or any resistance.
- Adjust the catch tension using the adjustment screws or bolts if your kit provides them.
- Check for hood flutter. Take your Jeep for a short drive, gradually increasing speed. Watch the hood from inside—there should be no movement.
If you spot any misalignment, loosen the bolts and readjust. Take your time; good alignment prevents wear and keeps your Jeep looking sharp.
Common Mistakes To Avoid
Even experienced DIYers sometimes make errors. Here’s what to watch for:
- Skipping the alignment check. If the catches aren’t lined up, the hood may not close correctly or could even bend.
- Over-tightening bolts. This can crack plastic or damage the threads, leading to expensive repairs.
- Forgetting threadlocker. Bolts can loosen from engine vibration, especially off-road.
- Not cleaning mounting areas. Dirt under the catch can scratch your paint or cause rust.
- Losing small parts. Work on a clean surface and keep bolts in a tray or cup.
Extra insight: Some upgraded catches are painted or powder-coated. Be gentle during installation to avoid chipping the finish.

Credit: www.amazon.com
Aftercare And Maintenance
Once your new hood catches are installed, a little maintenance will keep them working perfectly for years.
- Check bolts every few months to make sure they’re still tight.
- Clean the catches with mild soap and water—avoid harsh chemicals that can damage finishes.
- Lubricate moving parts if recommended by the manufacturer.
- Inspect for wear after off-roading trips or exposure to salt and mud.
If you notice any corrosion or sticking, address it immediately. Well-maintained catches can last the lifetime of your Jeep.
Real-world Results: Before And After
Here’s how the upgrade usually changes your Jeep Wrangler experience:
| Before | After |
|---|---|
| Noticeable hood flutter at speeds over 50 mph | Hood stays steady even on highways and off-road |
| Worn rubber latches showing cracks and UV damage | New, sturdy catches with a custom look |
| Worry about accidental hood opening | Confident, secure hood closure every time |
Many Jeep owners say they wish they’d upgraded sooner. It’s a simple project with a big impact on daily driving and off-road confidence.
When To Seek Professional Help
Most Jeep hood catch upgrades can be done in your driveway in about 30-60 minutes. But if you run into problems like:
- Stripped bolts or rusted hardware
- Broken mounting points
- Difficulty aligning the hood
…it’s smart to ask for help. A professional mechanic or body shop can often fix issues quickly and safely.
If you’re unsure which hood catch to buy, or want extra security features, a Jeep dealership or specialist shop can offer advice based on your needs.
Safety Tips
- Always wear safety glasses when working with tools under the hood.
- Don’t work under a hot engine—let everything cool down first.
- Use the right size tools to avoid stripping bolts.
- Double-check all work before hitting the road.
A careful approach means your upgrade is both safe and successful.
Frequently Asked Questions
How Long Does It Take To Install Jeep Wrangler Hood Catches?
Most people complete the installation in 30 to 60 minutes. If you’re new to DIY projects, allow extra time for reading instructions and making adjustments.
Do I Need To Drill New Holes For Aftermarket Hood Catches?
No, most quality aftermarket hood catches are designed to fit factory mounting points. Always check the product description and instructions before purchasing.
Will Upgraded Hood Catches Stop All Hood Flutter?
Yes, a well-installed set of heavy-duty hood catches eliminates hood flutter in almost every case. If you still notice movement, check alignment and tension.
Can I Reuse The Bolts From My Old Catches?
Sometimes. If the original bolts are in good shape and match the new hardware, you can reuse them. But new kits usually include upgraded bolts for best results.
Where Can I Find More Information About Jeep Wrangler Upgrades?
For more in-depth guides and Jeep community advice, visit the official Jeep Wrangler website. You’ll find specs, maintenance tips, and accessory recommendations.
—
Upgrading your Jeep Wrangler hood catch is an easy way to boost both safety and style. With just basic tools and a bit of time, you can eliminate hood flutter and make your Wrangler feel sturdier—whether you’re commuting or climbing trails. Remember, attention to detail during installation pays off for years of confident driving. Enjoy the road ahead!