
How to Install Jeep Fender Flares

Upgrading your Jeep with new fender flares not only boosts its off-road capability but also gives it a sharper appearance. If you’re ready to install Jeep fender flares, this detailed guide walks you through the process, from choosing the right type to final adjustments, ensuring a clean and secure fit for models like the Wrangler or Gladiator.
Why Add Fender Flares to Your Jeep?
Adding fender flares to your Jeep does more than just change how it looks. These pieces help protect the body from mud, rocks, and other stuff that tires throw up during drives, especially on trails. They also let you run bigger tires without rubbing issues, which is key for anyone lifting their ride or swapping wheels. For many Jeep owners, this upgrade keeps things legal too, since some areas require tires to stay covered.
Think about your driving habits. If you stick to city streets, a basic set might do the trick. But for trail runs, wider or tougher flares make sense. Options range from plastic to metal, each with its own perks. Plastic ones flex better against hits, while metal holds up strong but might need extra support. No matter what, getting the install right means fewer headaches down the line.
Types of Jeep Fender Flares
Before you start to install Jeep fender flares, pick the style that fits your setup. There are several kinds out there, and each suits different needs.
Factory-style flares mimic what came on your Jeep from the start. They’re straightforward replacements if yours got damaged. Flat flares sit closer to the body, giving more room for tires and better angles on rocks. Pocket-style ones have that bolted look, adding a rugged vibe with fake rivets or real hardware. Tube flares, made from steel, offer slim profiles for tight spots but stand up to scrapes.
For Wranglers, high-clearance options work well with 35-inch tires or more. Gladiators might need sets that account for the bed. Aluminum flares keep weight down, which helps with handling. Steel versions add strength but can rust if not cared for. Check fit for your year – JK, JL, or JT models vary slightly in mounting points.

Image credit: youtube.com
“Removing the factory renders is the first step and could require the unhooking of light wires as well as the removal of some hardware,” says the team at ExtremeTerrain.
Here’s a quick table to compare common types:
| Type | Material Options | Best For | Width Range |
|---|---|---|---|
| Factory-Style | Plastic | Daily Driving | 2-3 inches |
| Flat | Plastic or Metal | Trail Clearance | 4-6 inches |
| Plastic with Rivets | Aggressive Look | 5-7 inches | |
| Tube | Steel | Heavy Off-Road | 3-5 inches |
This helps narrow things down based on what you drive.
Tools and Materials You’ll Need
Gathering everything first saves time when you install Jeep fender flares. Most kits come with hardware, but double-check. Basic hand tools cover a lot, but some flares need drilling or wiring for lights.
Start with a ratchet set, including 10mm and 13mm sockets. A clip removal tool pops off old fasteners without breaking them. You’ll want a Phillips screwdriver, wire cutters if there’s lighting, and maybe a drill with 1/8-inch and 1/4-inch bits for holes. Don’t forget safety gear like gloves and eye protection.
For wiring, grab connectors and T-taps. Some installs use rivets, so a rivet gun helps. Clean the area with alcohol wipes to ensure good adhesion if using tape.
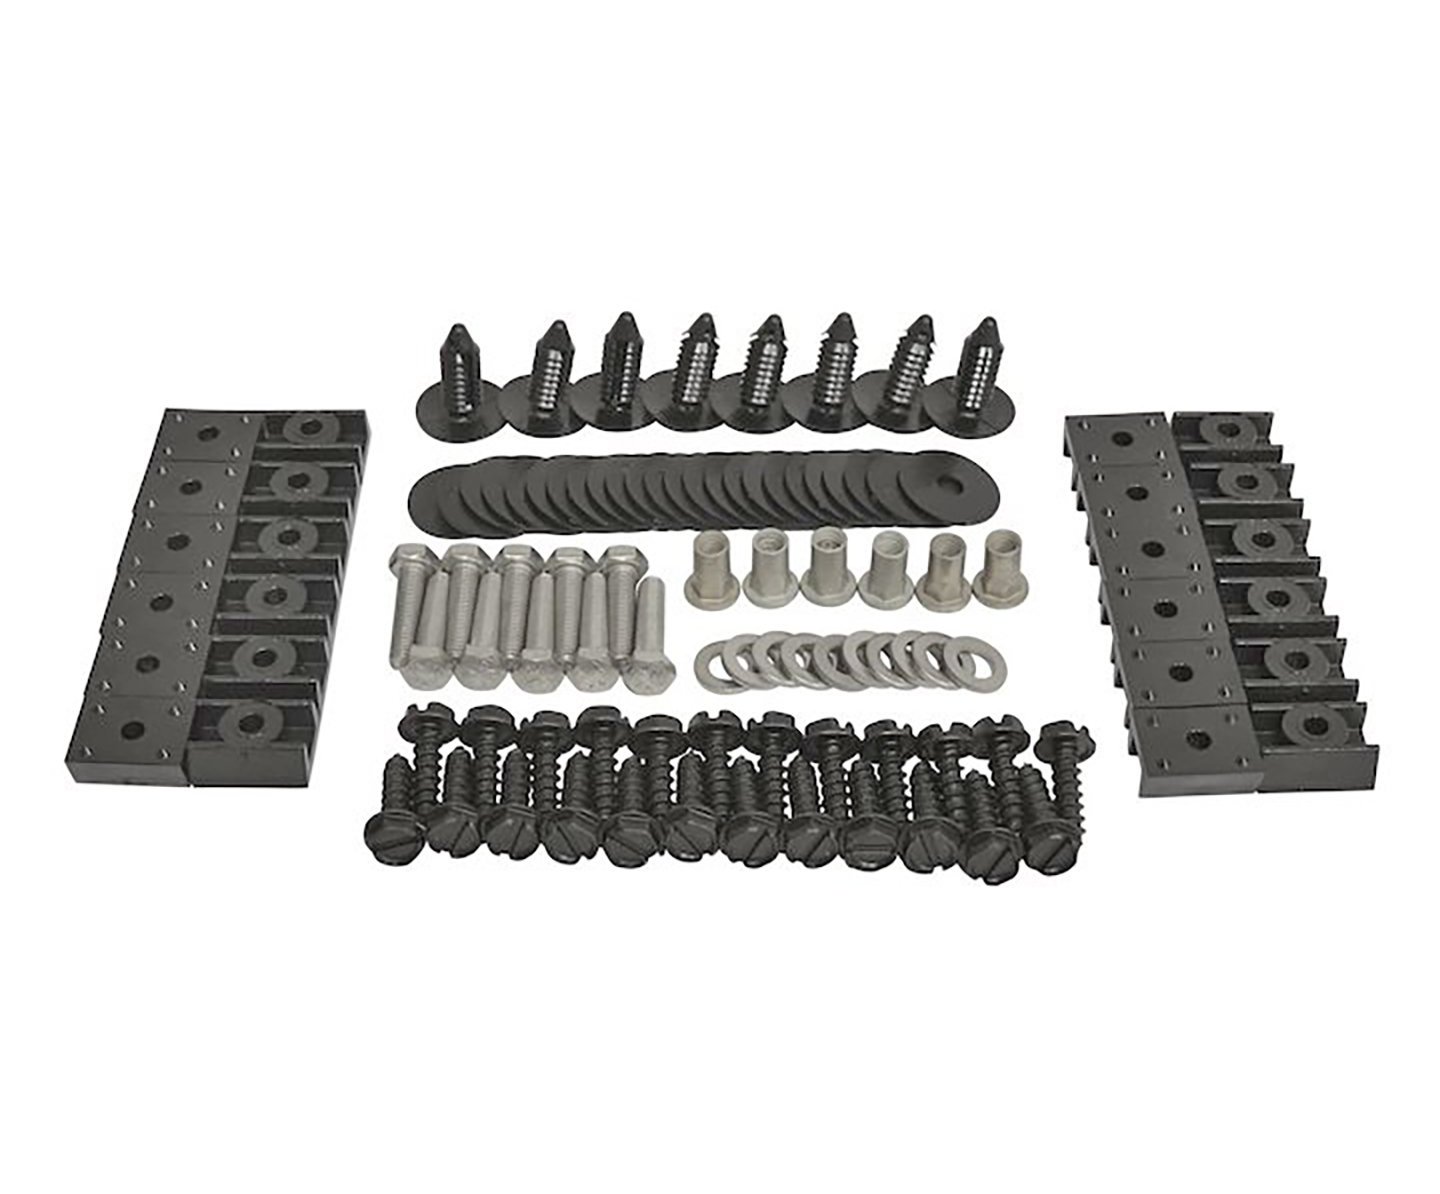
Image credit: quadratec.com
Crown Automotive 4918K Fender Flare Hardware Kit for 97-06 Jeep Wrangler TJ and Unlimited | Quadratec
A table of essential tools:
| Tool | Purpose | Quantity Needed |
|---|---|---|
| Ratchet & Sockets | Removing Bolts | 1 Set |
| Clip Removal Tool | Popping Fasteners | 1 |
| Drill & Bits | Making Holes | 1 with Bits |
| Screwdriver | Securing Screws | 1 Phillips |
| Rivet Gun | Attaching Rivets | 1 (if needed) |
With these, you’re set for most jobs.
Preparing Your Jeep for Installation
Prep work makes the difference when you install Jeep fender flares. Park on a flat spot and jack up if needed for access. Clean the wheel wells – dirt can mess with fit.
Remove old flares first. For fronts, unplug lights if present. Use the clip tool to release fasteners; there might be 8-10 per side. Pull gently to avoid scratches. Rears are similar but check for extra bolts near the tail.
Inspect the body for damage. Fix any rust or dents now. Test-fit new flares to spot issues early. Align them and mark holes if drilling. This step avoids surprises.
For models like the Wrangler JK, you might trim brackets. JL versions often bolt on directly. Gladiators need rear checks for bed alignment. Take your time here – good prep leads to a solid install.
“On average, it takes about 2-4 hours to install a full set of fender flares. It’s a manageable DIY project with the right tools and patience,” notes Off-Road.com.
Step-by-Step Guide to Install Jeep Fender Flares
Now for the main part: how to install Jeep fender flares. We’ll break it down by front and rear, with tips for different models.
Front Fender Flares
Start with the passenger side. Position the flare and clip it in place. Use supplied bolts – often 8 per side – and tighten loosely at first. Adjust for even gaps.
If drilling, use a 1/8-inch bit for pilots, then widen to 1/4-inch. Insert rivnuts or clips. For LED lights, connect wires: black to ground, yellow to turn signal.
Repeat on the driver side. Check alignment from the front – they should match.
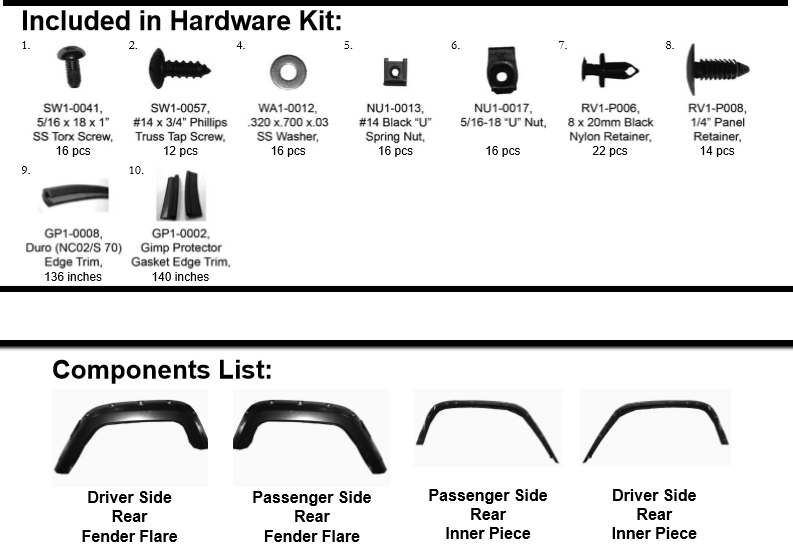
Image credit: extremeterrain.com
How to Install Bushwacker Pocket Flares on your 07-18 Jeep Wrangler JK | ExtremeTerrain
Rear Fender Flares
Rears follow a similar path. Remove old ones by drilling out rivets if stuck. Clean the area.
Mount the new flare, starting from the top. Secure with bolts or rivets. For Gladiators, ensure it clears the bed edge. Tighten all hardware once aligned.
On Wrangler Unlimited models, watch for door interference. Test open and close.
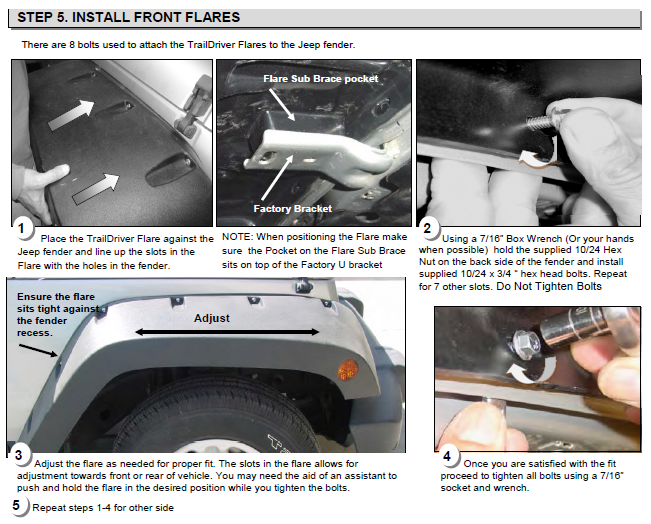
Image credit: extremeterrain.com
How to Install Barricade Rivet Style Fender Flare Kit on your Wrangler | ExtremeTerrain
Variations for Different Jeep Models
Wrangler JK: Often needs bracket trimming. Use a hacksaw for “ear” tabs.
Wrangler JL: Bolt-on easy, but LED wiring is common.
Gladiator JT: Rear flares might require extra rivets for stability.
Cherokee XJ: Adapt Wrangler flares with cuts for fit.
Each model has quirks, so refer to your kit’s guide.
Common Mistakes and How to Avoid Them
Even experienced folks slip up when they install Jeep fender flares. One big error: skipping test-fit. This leads to misalignment. Always dry-run.
Another: over-tightening bolts early. It warps the flare. Loosen and adjust as you go.
Ignoring instructions causes issues like wrong holes. Read them fully.
For drilling, go perpendicular to avoid dents. Step up bit sizes.
Not sealing edges invites rust. Use silicone on cuts.
By watching these, your install stays smooth.
Troubleshooting During Installation
If flares don’t line up, check for bent brackets. Straighten or replace.
Wiring problems? Test connections with a multimeter.
Gaps too big? Shim with washers.
For stuck fasteners, use pliers gently.
If rivets fail, get extras from auto stores.
These fixes keep things moving.
Maintenance After You Install Jeep Fender Flares
Once done, keep them looking good. Wash with mild soap – avoid harsh chemicals.
For plastic, use UV protectant to prevent fading. Apply monthly.
Metal flares? Check for rust; touch up paint as needed.
Inspect bolts quarterly; tighten if loose.
Off-road? Rinse mud off soon to avoid buildup.
Simple care extends life.
“Drill pilot hole with 1/8in drill bit in center of the 3 holes on the fender. Then chase it with a 1/4in drill bit making sure both times you are going in perpendicular to the surface,” advises a user from JLWranglerForums.
Frequently Asked Questions (FAQ)
How long does it take to install Jeep fender flares? It usually takes 2-4 hours for a full set, depending on your experience and if drilling is needed.
Do I need to drill holes?
Some kits require it for secure fit, especially metal ones. Others bolt on factory spots.
Can I install them alone?
Yes, but a helper makes alignment easier.
What if my flares have lights?
Wire them to existing signals. Use connectors for a clean job.
Are flares model-specific?
Mostly yes – JK, JL, JT differ. Check compatibility.
How do I remove stuck rivets?
Drill centers and pull with pliers. Replace with new ones.
These cover the basics.
Wrapping It Up
To install Jeep fender flares brings new life to your ride, blending function with style. From picking types to the final bolt, this process builds confidence in handling your Jeep. Remember the prep, steps, and care tips to enjoy them long-term. If you’re new, start with a simple kit. For more, check forums or local shops for advice. Grab your tools and get started – your Jeep will thank you.
Related posts
 How to Prevent Wear and Tear on Floor Mats
Learn practical ways to prevent wear and tear on your floor mats, extending their life and protecting your floors. Discover cleaning, maintenance, and protection tips. Preventing…
 How to Install All-Weather Car Floor Mats: A Simple Guide
Learn how to install all-weather car floor mats correctly. Follow these easy steps to protect your vehicle's interior from dirt, spills, and wear. Installing all-weather mats…
 Best Car Floor Mats for Pet Owners: Protect Your Interior from Fur & Spills
Discover the best car floor mats for pet owners. Protect your vehicle from fur, mud, and spills with durable, easy-to-clean options designed for pets. For pet…